I do love a good blog hop - and my good friends at Craft Attitude know how to do it right! I'm delighted to take part in their Fourth of July blog hop - here's how you can make a vintage-inspired Americana centerpiece for your party table.
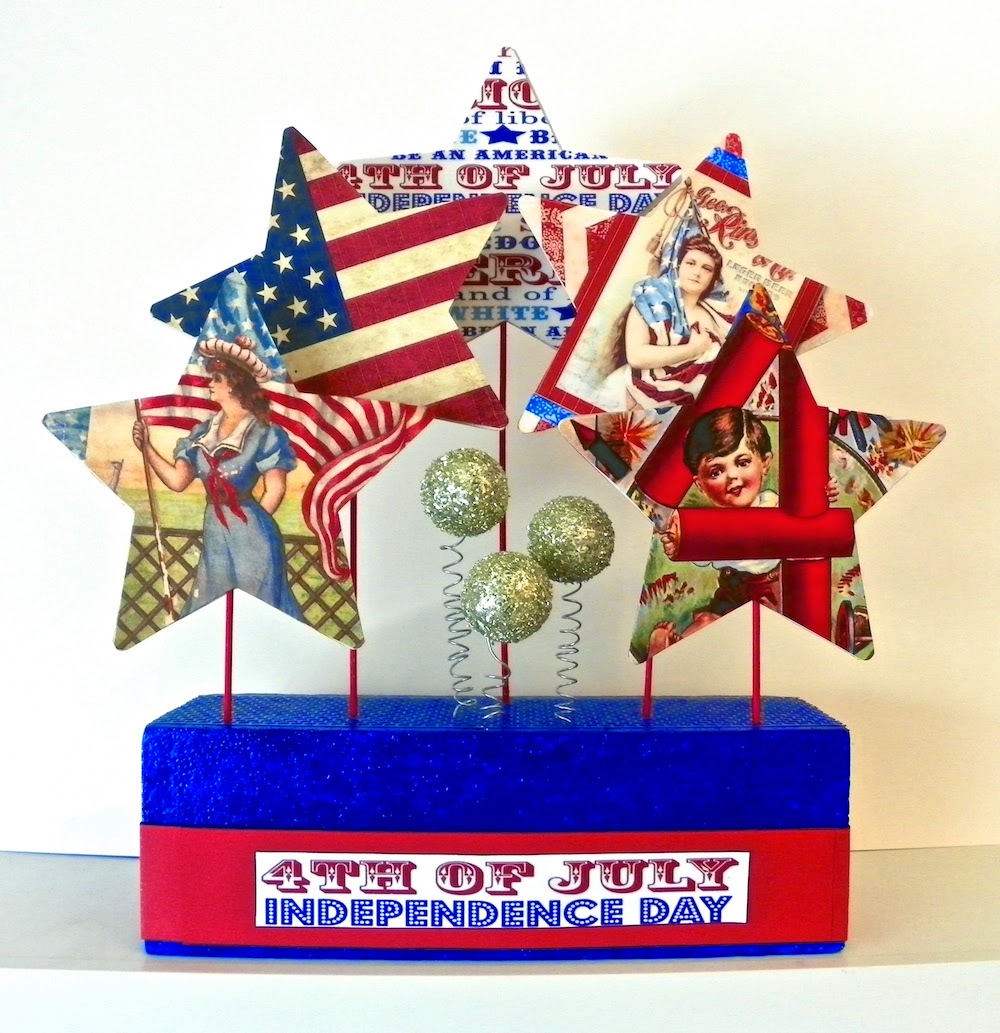 The foundation is two 2"x4"x12" blocks of Smoothfoam glued together, then painted with two coats of blue acrylic paint. I added a topcoat of Triple-Thick Gloss Glaze to give it a little shine. I attached a few 2" strips of red cardstock together to make a long strip and wrapped it around the base. I printed out my title on Craft Attitude (in reverse) and adhered it to white cardstock.
I found a pack of ten 7" white cardboard stars in the kids aisle of my local craft store - perfect! Then I dug around online for several different nice vintage Americana images and printed them on to sheets of Craft Attitude Inkjet Film.

I rubbed one side of each star with a glue stick, positioned it on my printed image, then used a brayer to press the star firmly on to the film. Remember to print images in reverse - the star goes down on the inked side of the film. Then I cut the film all around the star to fit and peeled off the paper liner. Some images were large enough to fit the whole star in one piece. For the smaller images, I centered them on the star, then I used the scraps from the larger images to fill in the star points as needed.
I attached two stars together with just three adhesive foam squares as shown - it creates a little place to insert a painted wood skewer between the stars without any other glue, then you can tilt the stars on the skewers if you want, plus they're easy to take apart for storage. Having images on both sides allows the centerpiece to look nice from the back as well as the front.

I glued a strip of sequin waste to the top to help keep the skewers steady in their holes as I poked the stars into the foam block, with shorter stars in front and the tallest star in back.
The last step is the cute little Smoothfoam balls, painted with clear gel glue and dipped in chunky vintage glass glitter. I wound some heavy-gauge wire around a pencil to make little springs, leaving an inch or two straight at each end. I poked a ball on the wire, the wire into the block - they're super cute and jiggly wiggly!

Now some of you might be thinking...why not just run white cardboard through the inkjet to print the images and text directly? Why print everything on Craft Attitude film first? There are a few really good reasons - buying pre-cut stars and cutting the film to fit is much easier than printing and cutting white cardboard...my scissor fingers would have been so unhappy cutting all that cardboard. Some thicker substrates don't go through the inkjet printer easily, and the matte finish of the film ensures a really nice, crisp print.
Give a like to Craft Attitude on Facebook, follow them on Twitter, and check 'em out on Pinterest, too. You can customize pretty much any surface you want with your favorite images and Craft Attitude - it has a yummy smooth matte finish that hugs the surface and melts right in so it looks custom-printed - even embossed and textured surfaces.
More designers will be posting all week!
I found a pack of ten 7" white cardboard stars in the kids aisle of my local craft store - perfect! Then I dug around online for several different nice vintage Americana images and printed them on to sheets of Craft Attitude Inkjet Film.
I rubbed one side of each star with a glue stick, positioned it on my printed image, then used a brayer to press the star firmly on to the film. Remember to print images in reverse - the star goes down on the inked side of the film. Then I cut the film all around the star to fit and peeled off the paper liner. Some images were large enough to fit the whole star in one piece. For the smaller images, I centered them on the star, then I used the scraps from the larger images to fill in the star points as needed.
I attached two stars together with just three adhesive foam squares as shown - it creates a little place to insert a painted wood skewer between the stars without any other glue, then you can tilt the stars on the skewers if you want, plus they're easy to take apart for storage. Having images on both sides allows the centerpiece to look nice from the back as well as the front.
I glued a strip of sequin waste to the top to help keep the skewers steady in their holes as I poked the stars into the foam block, with shorter stars in front and the tallest star in back.
The last step is the cute little Smoothfoam balls, painted with clear gel glue and dipped in chunky vintage glass glitter. I wound some heavy-gauge wire around a pencil to make little springs, leaving an inch or two straight at each end. I poked a ball on the wire, the wire into the block - they're super cute and jiggly wiggly!
Now some of you might be thinking...why not just run white cardboard through the inkjet to print the images and text directly? Why print everything on Craft Attitude film first? There are a few really good reasons - buying pre-cut stars and cutting the film to fit is much easier than printing and cutting white cardboard...my scissor fingers would have been so unhappy cutting all that cardboard. Some thicker substrates don't go through the inkjet printer easily, and the matte finish of the film ensures a really nice, crisp print.
Give a like to Craft Attitude on Facebook, follow them on Twitter, and check 'em out on Pinterest, too. You can customize pretty much any surface you want with your favorite images and Craft Attitude - it has a yummy smooth matte finish that hugs the surface and melts right in so it looks custom-printed - even embossed and textured surfaces.
More designers will be posting all week!